Getting Started
ROOK publishes its Native Modules and TurboModule implementations under the same npm package name. React Native 0.73 projects using the classic architecture should pin react-native-rook-sdk 4.x, while React Native 0.83 projects using the New Architecture should pin 5.x. After selecting a track, configure Apple Health, Health Connect, or Samsung Health and wrap the app in RookSyncGate. Do not embed production credentials in a JavaScript bundle.
The Fundamentals section covers the common ROOK API as well as the native configuration required for Apple Health, Health Connect, and Samsung Health.
Choose the correct SDK track
Both implementations are distributed as react-native-rook-sdk. Select the major version that matches the architecture of the client's project and pin that major version in package.json.
| Client project | React Native architecture | ROOK SDK | Source repository |
|---|---|---|---|
| React Native 0.73 | Native Modules (classic bridge) | 4.x (current reference: 4.1.1) | react-native-rook-sdk |
| React Native 0.83 | New Architecture with TurboModules | 5.x (current reference: 5.2.0) | turbo-react-native-rook-sdk |
Use 4.x when maintaining a React Native 0.73 application that still uses the classic Native Modules architecture. Use 5.x when the application has migrated to React Native 0.83 and the New Architecture. The public hooks are largely consistent, but the packages are not interchangeable at the native layer.
Do not use an unversioned install command. Both tracks have the same package name, so a normal dependency update could otherwise move a Native Modules client to the TurboModule implementation.
For a React Native version or architecture not listed above, validate the native build before release or contact ROOK support. These are the reference combinations covered by this guide, not a claim that every intermediate React Native version is compatible.
If you are upgrading an existing application from 4.x to 5.x, follow the Native Modules to TurboModules migration guide.
Minimum requirements
- Native Modules track: React Native 0.73 and
react-native-rook-sdk4.x. - TurboModule track: React Native 0.83, the New Architecture, and
react-native-rook-sdk5.x.
iOS
ios>= 13.0- CocoaPods
- Use the Xcode version required by the selected React Native release and ROOK native dependencies. The current 5.x repository is validated with Xcode 26.0.
Android
- JDK 17 for the 5.x TurboModule development toolchain.
- Use the Android SDK and Kotlin versions required by the selected ROOK major and its native dependencies. Do not copy the values from one track into the other.
Installation
Native Modules — React Native 0.73
- npm
- Yarn
- pnpm
npm install react-native-rook-sdk@^4yarn add react-native-rook-sdk@^4pnpm add react-native-rook-sdk@^4TurboModules — React Native 0.83
- npm
- Yarn
- pnpm
npm install react-native-rook-sdk@^5yarn add react-native-rook-sdk@^5pnpm add react-native-rook-sdk@^5If you're on a Mac and developing for iOS, you need to install the pods (via Cocoapods) to complete the linking.
npx pod-install
Both tracks contain native code and therefore require a native iOS or Android build. They do not run in Expo Go.
Configure Apple Health and Health connect
Apple Health (iOS)
We need to add Apple Health Kit Framework to our project in order to that please:
- Open your project in Xcode.
- Click on your project file in the Project Navigator.
- Select your target and then click on the "Build Phases" tab.
- Click on the "+" button under the "Link Binary With Libraries" section and select "HealthKit.framework" from the list.
- Select your target and then click on the "Signing Capabilities" tab.
- Click on "Add Capability" and search for "HealthKit"
Additionally add the following to the info.plist
<key>NSHealthShareUsageDescription</key>
<string>This app requires access to your health and fitness data in order to track your workouts and activity levels.</string>
<key>NSHealthUpdateUsageDescription</key>
<string>This app requires permission to write healt data to HealthKit.</string>
Samsung health (Android)
First, open your app module's build.gradle file. You'll need to download the samsung-health-data-api-1.1.0.aar file and place it in your project's libs directory.
If the libs folder doesn't exist yet, create it in the root of your project.
Your project directory structure should look like this:
android
├── app
│   ├── build
│   ├── build.gradle
│   ├── debug.keystore
│   ├── proguard-rules.pro
│   └── src
├── build
│   └── generated
├── build.gradle
├── gradle
│   └── wrapper
├── gradle.properties
├── gradlew
├── gradlew.bat
├── libs  <---- create this folder if it doesn't exist
│   └── samsung-health-data-api-1.1.0.aar
├── local.properties
└── settings.gradle
In your build.gradle file (project-level or module-level, depending on your setup), add the following line inside the dependencies block:
dependencies {
    implementation files("$rootDir/libs/samsung-health-data-api-1.1.0.aar")
}
Request data access
During development, you can access Samsung Health data by enabling developer mode.
To have data access in the production environment, you must submit the Samsung's Partnership Request Form.
Please submit partner request before your app distribution. Your app's package name and signature (SHA-256) will be registered in the Samsung Health's system after an approval.
Ensure that the correct app signature and package name is registered. If your published app signature differs from what you have provided, your app will not have access to Samsung's data.
You will see a section like this, select only the data types under the "Read" section:
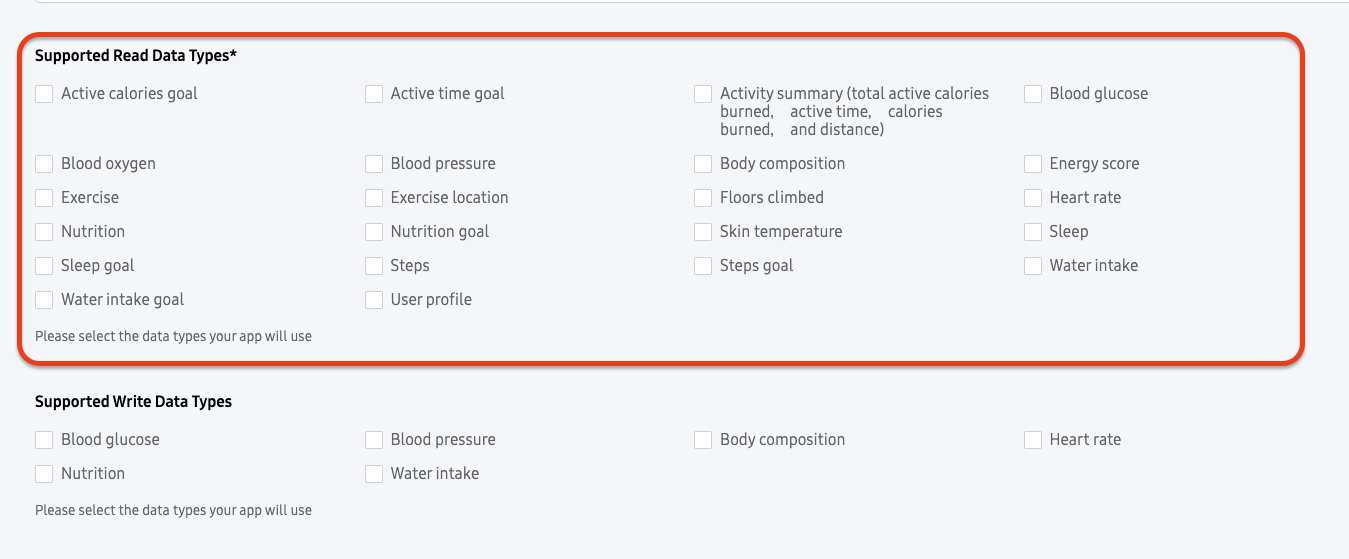
This SDK uses the following data types, however you don't need to declare all of them if you don't use it.
- ACTIVITY_SUMMARY
- BLOOD_GLUCOSE
- BLOOD_OXYGEN
- BLOOD_PRESSURE
- BODY_COMPOSITION
- EXERCISE
- EXERCISE_LOCATION
- FLOORS_CLIMBED
- HEART_RATE
- NUTRITION
- SLEEP
- STEPS
- WATER_INTAKE
If you exclude a data type of the previous list DO NOT use it in the permissions functions (check/request).
Health Connect (Android)
We need to configure the Android project. Open the Android project in Android Studio. To access the Health connection records, we need to modify the AndroidManifest.xml file. Add an intent filter inside your activity tag to open the Health Connect app. Your AndroidManifest.xml file should look like this:
<manifest xmlns:android="http://schemas.android.com/apk/res/android">

    ...

    <application
      ...>
      <activity
        ...>
        <intent-filter>
            ...
        </intent-filter>

        <!-- For supported versions through Android 13, create an activity to show the rationale
        of Health Connect permissions once users click the privacy policy link. -->
          <intent-filter>
              <action android:name="androidx.health.ACTION_SHOW_PERMISSIONS_RATIONALE" />
          </intent-filter>
      </activity>

       <!-- For versions starting Android 14, create an activity alias to show the rationale
     of Health Connect permissions once users click the privacy policy link. -->
      <activity-alias
        android:name="ViewPermissionUsageActivity"
        android:exported="true"
        android:permission="android.permission.START_VIEW_PERMISSION_USAGE"
        android:targetActivity=".MainActivity">

        <intent-filter>
          <action android:name="android.intent.action.VIEW_PERMISSION_USAGE" />
          <category android:name="android.intent.category.HEALTH_PERMISSIONS" />
        </intent-filter>
      </activity-alias>
    </application>
</manifest>
Included permissions
This SDK will use the following permissions, there is no need to declare them in your manifest as the rook-sdk already declares them in its own manifest:
<uses-permission android:name="android.permission.ACTIVITY_RECOGNITION"/>
<uses-permission android:name="android.permission.FOREGROUND_SERVICE"/>
<uses-permission android:name="android.permission.FOREGROUND_SERVICE_HEALTH"/>
<uses-permission android:name="android.permission.POST_NOTIFICATIONS"/>
<uses-permission android:name="android.permission.RECEIVE_BOOT_COMPLETED"/>

<uses-permission android:name="android.permission.health.READ_HEALTH_DATA_IN_BACKGROUND"/>
<uses-permission android:name="android.permission.health.READ_HEALTH_DATA_HISTORY"/>

<uses-permission android:name="android.permission.health.READ_SLEEP"/>
<uses-permission android:name="android.permission.health.READ_STEPS"/>
<uses-permission android:name="android.permission.health.READ_DISTANCE"/>
<uses-permission android:name="android.permission.health.READ_FLOORS_CLIMBED"/>
<uses-permission android:name="android.permission.health.READ_ELEVATION_GAINED"/>
<uses-permission android:name="android.permission.health.READ_OXYGEN_SATURATION"/>
<uses-permission android:name="android.permission.health.READ_VO2_MAX"/>
<uses-permission android:name="android.permission.health.READ_TOTAL_CALORIES_BURNED"/>
<uses-permission android:name="android.permission.health.READ_ACTIVE_CALORIES_BURNED"/>
<uses-permission android:name="android.permission.health.READ_HEART_RATE"/>
<uses-permission android:name="android.permission.health.READ_RESTING_HEART_RATE"/>
<uses-permission android:name="android.permission.health.READ_HEART_RATE_VARIABILITY"/>
<uses-permission android:name="android.permission.health.READ_EXERCISE"/>
<uses-permission android:name="android.permission.health.READ_SPEED"/>
<uses-permission android:name="android.permission.health.READ_WEIGHT"/>
<uses-permission android:name="android.permission.health.READ_HEIGHT"/>
<uses-permission android:name="android.permission.health.READ_BLOOD_GLUCOSE"/>
<uses-permission android:name="android.permission.health.READ_BLOOD_PRESSURE"/>
<uses-permission android:name="android.permission.health.READ_HYDRATION"/>
<uses-permission android:name="android.permission.health.READ_BODY_TEMPERATURE"/>
<uses-permission android:name="android.permission.health.READ_RESPIRATORY_RATE"/>
<uses-permission android:name="android.permission.health.READ_NUTRITION"/>
<uses-permission android:name="android.permission.health.READ_MENSTRUATION"/>
<uses-permission android:name="android.permission.health.READ_POWER"/>
<uses-permission android:name="android.permission.health.READ_BASAL_BODY_TEMPERATURE"/>
<uses-permission android:name="android.permission.health.READ_BODY_FAT"/>
<uses-permission android:name="android.permission.health.READ_LEAN_BODY_MASS"/>
<uses-permission android:name="android.permission.health.READ_BODY_WATER_MASS"/>
<uses-permission android:name="android.permission.health.READ_BONE_MASS"/>
Google may require you to provide an explanation about the FOREGROUND_SERVICE/FOREGROUND_SERVICE_HEALTH permissions.
These permissions are used by our Background Steps feature to track steps and upload it
to ROOK servers. We recommend asking users for permission before enabling these features. Google may also require a
video proof of a screen where a user can turn on or off these features.
Request data access
When you are developing with the Health Connect SDK, data access is unrestricted. To have data access when your app is launched on the Play Store, you must complete the Play Console Health apps declaration. More information can be found here.
You will se a list like below of the permissions your app uses, you will need to provide a description on how your app uses the data of each permission.
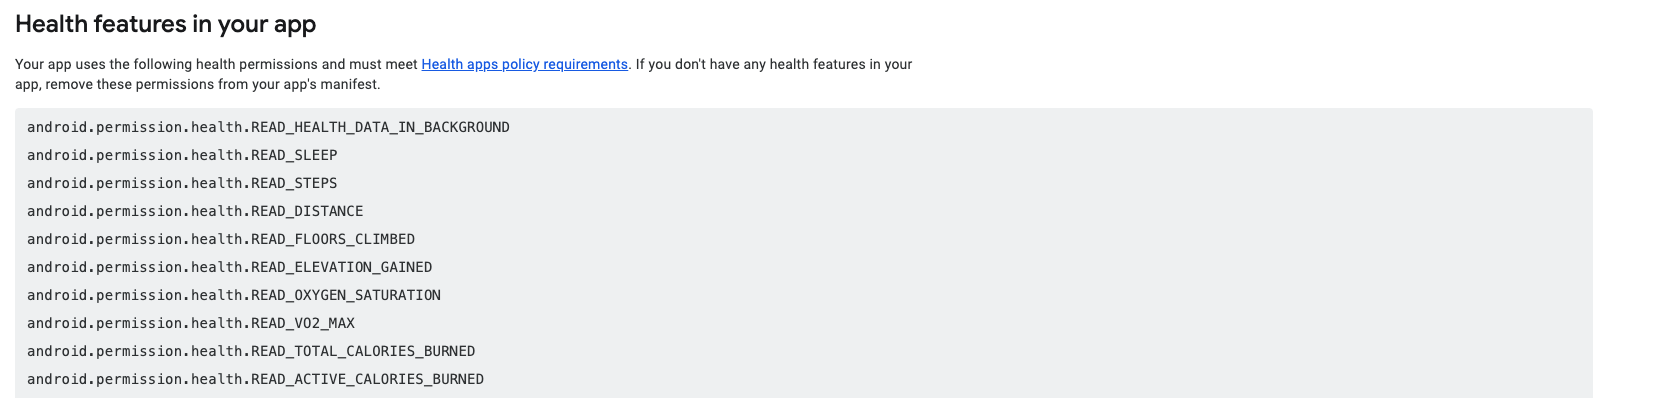
If you don't want access to a particular data type of Health Connect you can remove it.
Obfuscation
If you are using obfuscation consider the following:
In your gradle.properties (Project level) add the following to disable R8 full mode:
android.enableR8.fullMode=false
If you want to enable full mode add the following rules to proguard-rules.pro:
# Keep generic signature of Call, Response (R8 full mode strips signatures from non-kept items).
-keep,allowobfuscation,allowshrinking interface retrofit2.Call
-keep,allowobfuscation,allowshrinking class retrofit2.Response

# With R8 full mode generic signatures are stripped for classes that are not
# kept. Suspend functions are wrapped in continuations where the type argument
# is used.
-keep,allowobfuscation,allowshrinking class kotlin.cor  outines.Continuation
Wrapping your app in RookSyncGate
Now, we need to wrap the whole app in RookSyncGate in order to add your credentials that are generated by the Rook Portal. Usually you'd do this in your entry file, such as index.js or App.js:
import * as React from "react";
import { RookSyncGate } from "react-native-rook-sdk";

export default function App() {
  return (
    <RookSyncGate
      environment="sandbox | production"
      clientUUID="YOUR_CLIENT_UUID"
      secret="YOUR_SECRET_WORD"
      bundleId = {string | undefined}
      packageName = {string | undefined}
      enableLogs={true | false | undefined}
      enableBackgroundSync={true | false}
    >
      <YOUR-COMPONENTS />
    </RookSyncGate>
  );
}
The value of enableLogs will display or not local logs in the console for certain SDK operations, enableBackgroundSync enable the automatic sync, this means that the sdk will start sending information to the ROOK services automatically.
Do not include client uuid and secrect in .env files or directly in the source code.
These values will be embedded in the JavaScript bundle at build time and can be extracted through reverse engineering.
Please refer to the react native documentation to check more about it