Configure Background

Setting background functions allows us to send new information as we get notified. This helps to resend that information to you through your webhook previously configured in the ROOK Portal.

Enable background sync of data for iOS

To configure background upload you need to follow the steps bellow:

  • Add health kit to your project and enable background delivery.
  • Add Background modes and enable Background fetch.
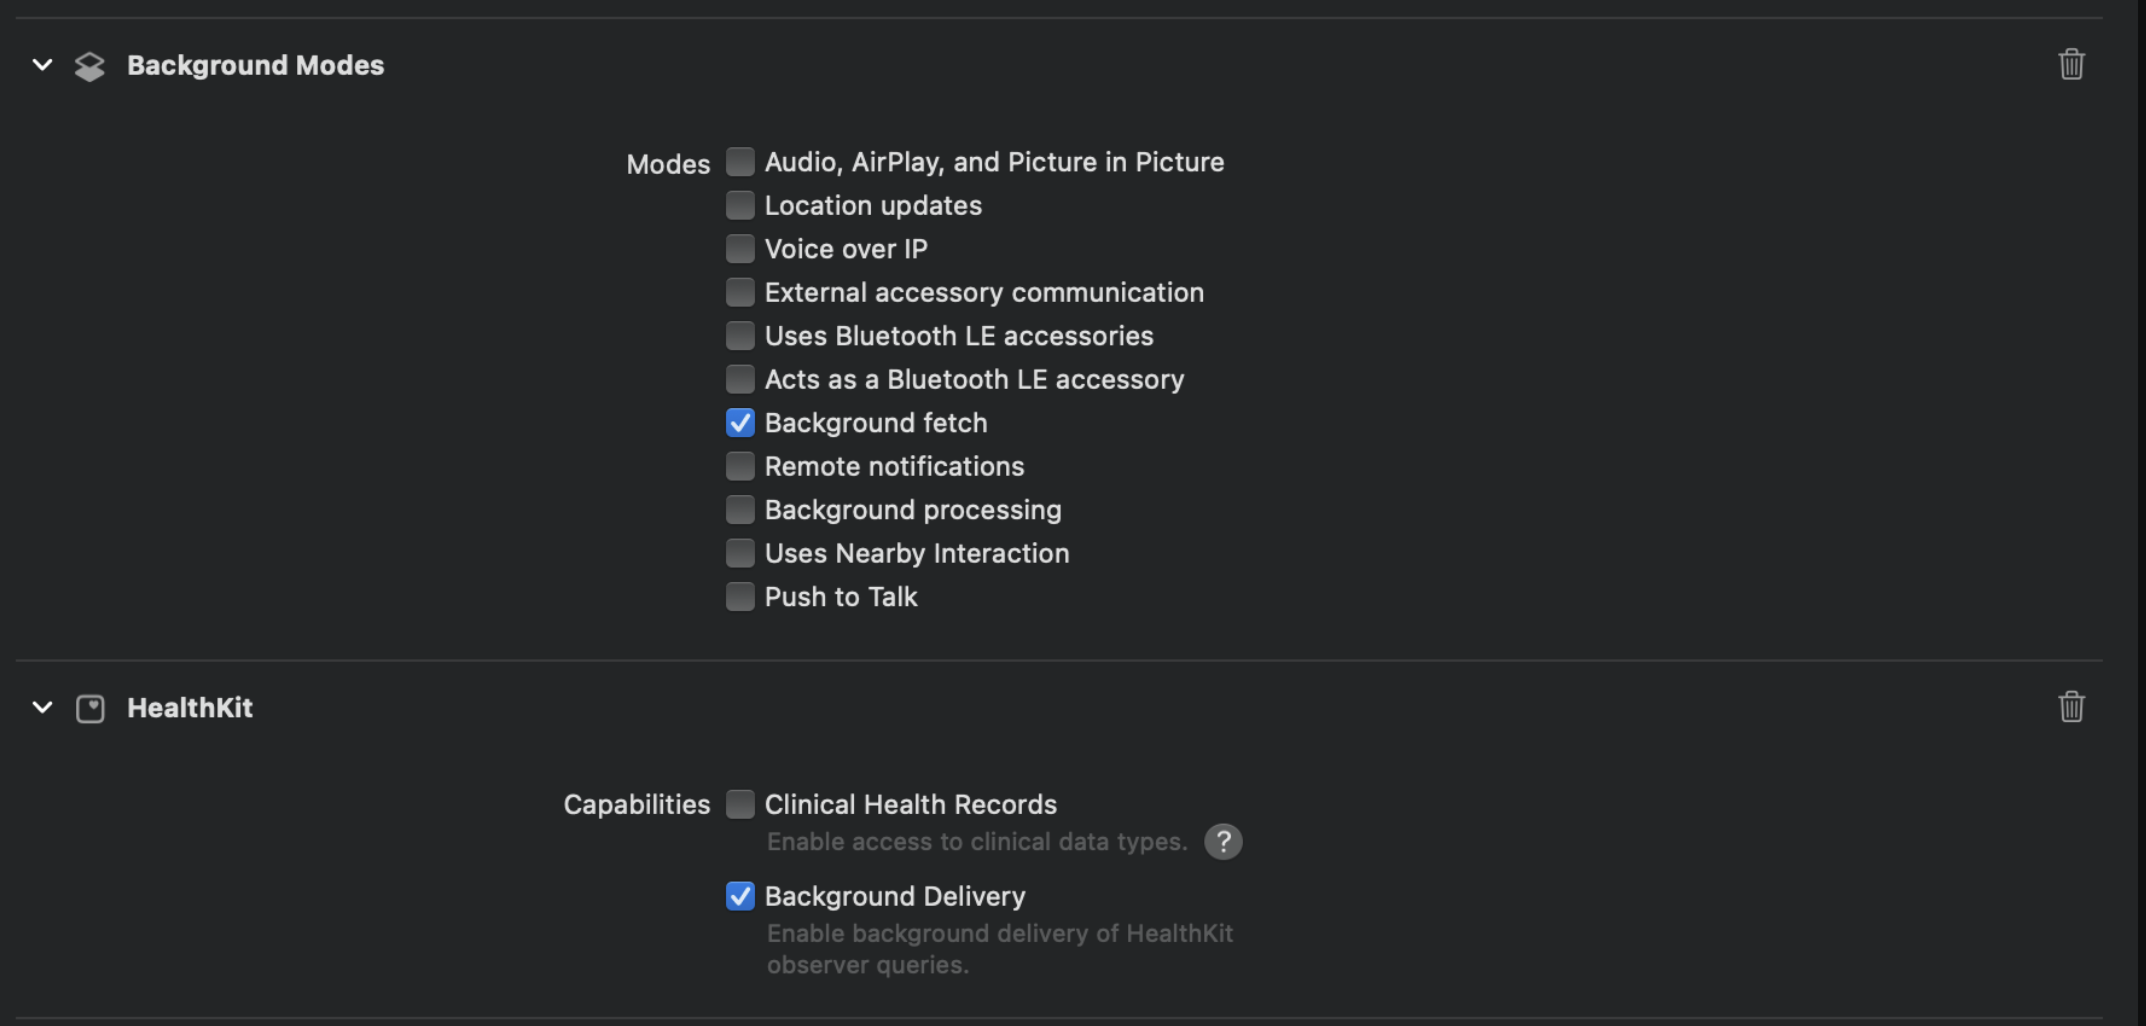
background_delivery

In the app delegate of your app add the setBackListeners method in didFinishLaunchingWithOptions function.


#import "AppDelegate.h"
#import "RookSDK/RookSDK-Swift.h"
#import <React/RCTBundleURLProvider.h>

@implementation AppDelegate

- (BOOL)application:(UIApplication *)application didFinishLaunchingWithOptions:(NSDictionary *)launchOptions
{
self.moduleName = @"RookSdkAppleHealthExample";
// You can add your custom initial props in the dictionary below.
// They will be passed down to the ViewController used by React Native.
self.initialProps = @{};
[[RookBackGroundSync shared] setBackListeners];

return [super application:application didFinishLaunchingWithOptions:launchOptions];
}

- (NSURL *)sourceURLForBridge:(RCTBridge *)bridge
{
#if DEBUG
return [[RCTBundleURLProvider sharedSettings] jsBundleURLForBundleRoot:@"index"];
#else
return [[NSBundle mainBundle] URLForResource:@"main" withExtension:@"jsbundle"];
#endif
}

@end

Next, we need to enable or indicate to the SDK to stay listening for new notifications. We recommend enabling this in your dashboard to ensure that the user activates this function, as shown below.

/* eslint-disable react-hooks/exhaustive-deps */
import React, { useEffect, useState } from "react";
import { Button } from "react-native";
import { Platform, StyleSheet, Text, View } from "react-native";
import {
useRookAppleHealth,
useRookEvents,
useRookSummaries,
} from "react-native-rook-sdk";

export const Dashboard = () => {
const [syncing, setSyncing] = useState(false);

const { ready, enableBackGroundUpdates } = useRookAppleHealth();

useEffect(() => {
if (ready && Platform.OS === "ios") {
enableBackGroundUpdates();
}
}, [ready]);

return (
<View style={styles.container}>
<Text style={styles.message}>Dashboard</Text>
</View>
);
};

const styles = StyleSheet.create({
container: {
flex: 1,
justifyContent: "center",
alignItems: "center",
paddingHorizontal: 20,
},
message: {
fontSize: 18,
marginBottom: 20,
textAlign: "center",
color: "white",
},
extra: {
marginTop: 50,
},
});

Enable Background sync of data for Android

To automatically sync health data, use the scheduleYesterdaySync function during your app's initialization phase. We highly recommend checking and saving whether the user has explicitly given you permission to sync data automatically. In this example, we use @react-native-async-storage/async-storage to achieve this.

First we need to request permissions, like we see in the first steps of requesting android background permissions.

doOnEnd available configurations:

oldest: After syncing yesterday data, subsequent syncs should start from the 29th day until the 2nd day (The day before yesterday). latest: After syncing yesterday data, subsequent syncs should start from the 2nd day (The day before yesterday) day until the 29th. nothing: Only sync yesterday data.

import React, { useEffect } from "react";
import { View } from "react-native";
import AsyncStorage from "@react-native-async-storage/async-storage";
import { useRookSyncConfiguration } from "react-native-rook-sdk";

function MyComponent() {
const { scheduleAndroidYesterdaySync } = useRookConfiguration();

useEffect(() => {
tryToEnableYesterdaySync();
}, []);

const tryToEnableYesterdaySync = async () => {
console.log("Attempting to enable yesterday sync...");

try {
const userAcceptedYesterdaySync = await AsyncStorage.getItem(
"ACCEPTED_YESTERDAY_SYNC"
);
const accepted = userAcceptedYesterdaySync === "true";

if (accepted) {
console.log("User accepted yesterday sync");
await scheduleAndroidYesterdaySync("oldest");
} else {
console.log("User did not accept yesterday sync");
}
} catch (error) {
console.error("Error retrieving data from AsyncStorage:", error);
}
};

return <View>{/* Your UI components here */}</View>;
}

export default MyComponent;

RookYesterdaySyncPermissions

scheduleYesterdaySync Requires 2 types of permissions

  • Android
    • POST_NOTIFICATIONS
    • FOREGROUND_SERVICE
    • FOREGROUND_SERVICE_HEALTH
    • ACTIVITY_RECOGNITION
  • Health Connect
    • SLEEP
    • PHYSICAL
    • BODY

To request or check both types of permissions use the you have to request permissions of health connect with useRookSyncPermissions().requestPermissions() in order to access to the health connect data and useRookSyncPermissions().requestAndroidBackgroundPermissions() to have access to the background services

Customizing the foreground service notification

To sync health data automatically a Foreground Service is used, this service requires a notification to be displayed until the synchronization finishes.

To use your own resources you need to reference them in the AndroidManifest.xml file:


<manifest xmlns:android="http://schemas.android.com/apk/res/android">
<application>
<meta-data
android:name="io.tryrook.service.notification.SYNC_ICON"
android:resource="@drawable/my_custom_icon"/>

<meta-data
android:name="io.tryrook.service.notification.SYNC_TITLE"
android:resource="@string/my_custom_title"/>

<meta-data
android:name="io.tryrook.service.notification.SYNC_CONTENT"
android:resource="@string/my_custom_content"/>
</application>
</manifest>
info

Starting on Android 13 (SDK 33) this notification can be dismissed without finishing the service associated with it, then the service will be displayed in the active apps section (This may vary depending on device brand).

Launch/Stop conditions

scheduleYesterdaySync won't start or will stop if one the following conditions are meet:

  • The device battery is low
  • The device storage is low
  • The device is not connected to the internet
  • The user hasn't granted Android Permissions (POST_NOTIFICATIONS, FOREGROUND_SERVICE, FOREGROUND_SERVICE_HEALTH)
  • The device has previously exceeded the Health Connect request quota and the recovery timestamp hasn't been meet
  • The user hasn't granted Health Connect Permissions (SLEEP, PHYSICAL, BODY)
  • The most recent request exceeded the Health Connect request quota
  • The userID hasn't been configured
  • There is an error initializing the SDK

Health Connect request quota

To maintain optimal system stability and performance, Health Connect imposes rate limits on client connections to the Health Connect API.

It is important for you to understand that every data type in rook-sdk is constructed of multiple health variables like heart rate, steps count, hydration, etc. So when a Sleep Summary is extracted there are multiple calls made to the Health Connect API, and whereas in the last months our efforts have been focused on optimizing and reducing the number of API call required for each data type it's still possible for that limit to be reached, especially while doing multiple extraction in a short amount of time.

Depending on the sync type you chose you must have the following things in mind:

Request quota when syncing data manually

  • Extract summaries once daily: Since summaries collect health data from a previous day, there's no need to extract them more than once per day.
  • Use what you already have: If you are extracting Physical Events you don’t need to extract Heart Rate Events ( Physical) or Oxygenation Events (Physical) as these are already included in the PhysicalEvent object.
  • Only sync the relevant health data for you use case: If you are not interested on individual events and only want to sync the summary of a specific date, just use the sync functions in useRookSyncSummaries.
  • If you already reached the request quota avoid calling any sync function for the next hours so your quota can be recovered.

Request quota when syncing data automatically

scheduleYesterdaySync already takes care of practically all issues and limitations of Health Connect. When the quota is reached, all pending syncs are canceled, and a recovery timestamp is created. Pending syncs will not resume until the user re-opens the app after a few hours.