Portal Configuration
The ROOK Portal allows you to create ROOK API access credentials and configure and manage integrations. This is the first mandatory step before you can start using the API.
What is the Portal?
The ROOK Portal is the platform for managing your ROOK integration. From here, you create access credentials, generate the necessary credentials to authenticate the API integration, and configure the various integration properties.
The Portal allows you to work in two independent environments: Sandbox and Production. Each environment has its own credentials and configurations, ensuring that testing does not affect live data.
Step 1: Create your account on the portal
Access the ROOK Portal and register an organizational account.
During registration, you will need to provide basic information such as:
- Email address and password.
- Company name.
- Industry.
- Project manager information.
- Estimated number of users.
Once registration is complete, the project will be automatically enabled in the Sandbox environment, allowing you to begin the technical configuration.
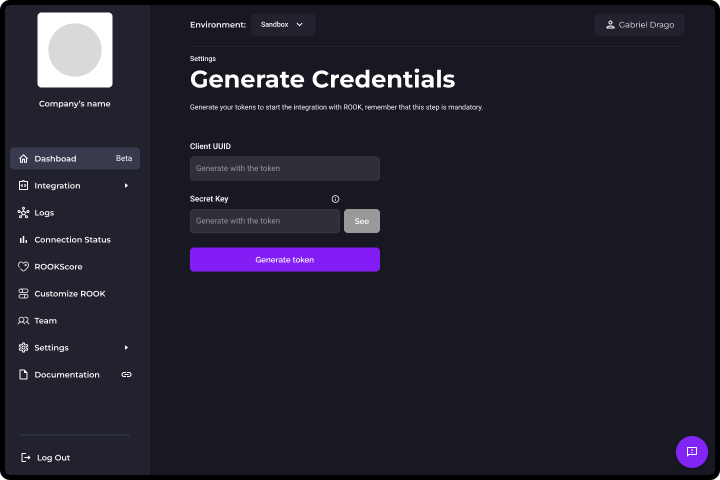
Step 2: Generate your credentials
After creating your account, you must generate the credentials that will allow your backend to authenticate against the ROOK API.
In the Portal, go to the settings section and generate:
- Client UUID
- Secret Key
- Remember that the generated credentials are only for the test environment. If you switch to a production environment, you will need to generate new credentials and replace them in your integration.
- The Secret Key is only displayed once, so it must be stored securely.
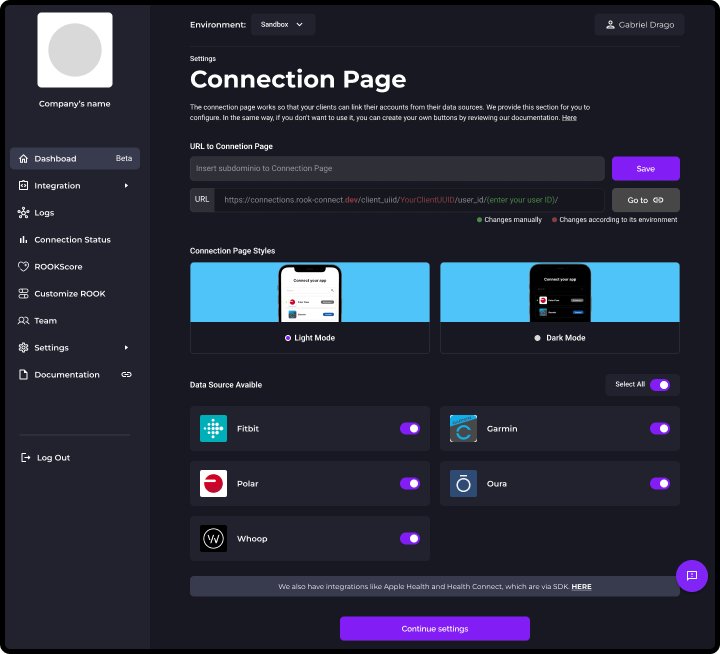
Step 3: Configure your Ready-to-Use connections page (Sandbox only)
ROOK provides a ROOK connections page for clients to quickly link and optimally generate data. This connections page is only available for data sources that connect via API.
In this section of the ROOK Portal, clients can customize basic visual elements, such as colors, to simulate their branding during the authorization process.
This page is designed exclusively for quick testing in test environments and should not be used in production environments.
Customers should create their own custom connections page or application view for production environments using the appropriate endpoints, as the connections page in test environments is not designed for real-time user authorization.
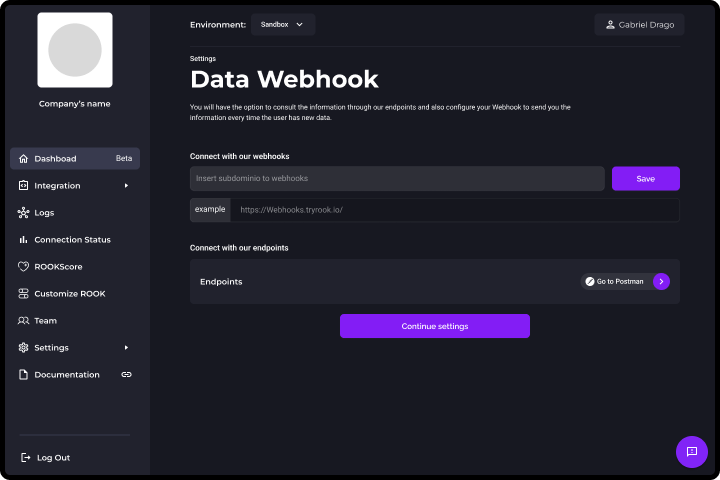
Step 4: Configure the data webhook
In the Portal, register a public URL that accepts POST requests. This endpoint will receive the data sent via the ROOK Data Webhook when information is available.
Once configured, verify that the endpoint can correctly receive and process the payloads. Before connecting users, you need to define the endpoint where you will receive the extracted data. Optionally, you can configure a Notification Webhook to receive events related to the integration status, such as connections or errors.
Webhooks are the primary mechanism through which clients receive user health data extracted from ROOK.
The API is available for specific queries and debugging purposes, but it is not designed for continuous data retrieval. See Data Delivery.
Next steps
To continue, we recommend you read one of these options:
- Continue integrating ROOKConnect