QuickStart Guide
Description
This QuickStart guide presents the essential steps to collect, process, and deliver health data using ROOK. Learn how to configure webhooks for real-time notifications, integrate mobile and API-based sources, and ensure a smooth Production deployment through ROOK APIs and SDKs.
Prerequisites
Team Requirements for ROOK Integration
To successfully integrate ROOK, your organization needs the following teams based on your APP needs:
Backend Team
- Receive Data: Build an API to receive health data sent by ROOK.
- Data Storage and Processing: Store the data securely for further processing.
- Serve Your APP: Develop an API to serve your end-user APP.
Frontend Team (Optional)
- Custom Connections Pages: Create a user-facing page that allows users to authorize access to their health data.
- Dashboards: Build dashboards to present health data clearly and actionably.
Mobile Team (If Needed)
ROOK integrates with two types of data sources: API-Based and Mobile-Based. Learn more about supported sources in Data Sources.
- If Interested in Mobile-Based Data Sources:
- Use the ROOK Extraction APP: A ready-to-use APP to collect data from Apple Health and Health Connect.
- Develop a Custom Mobile APP: Integrate ROOK SDKs for Apple Health and Health Connect.
Data Sources and Testing
Before integration, it is recommended to:
- Obtain Devices or Accounts for the selected data sources.
- Ensure Test Users Have Existing Data: Users should have pre-existing health data available.
- ROOK supports the extraction of pre-existing data. See Pre-existing Data for more information.
Recommended Architecture for ROOK Clients
-
Data Reception:
- Create an endpoint to receive webhook data from ROOK.
-
Data Storage:
- Store data securely for further analysis.
-
Backend Development:
- Receive, store, process, and serve the data to your APP.
-
Frontend or APP Integration:
- Integrate ROOK SDKs or use the ROOK Extraction APP for mobile-based data sources.
- Use backend APIs to serve data to web or mobile APPs.
Integration Steps
The integration process consists of three phases: account creation, Sandbox testing, and Production deployment.
Step 1: Create Your Account
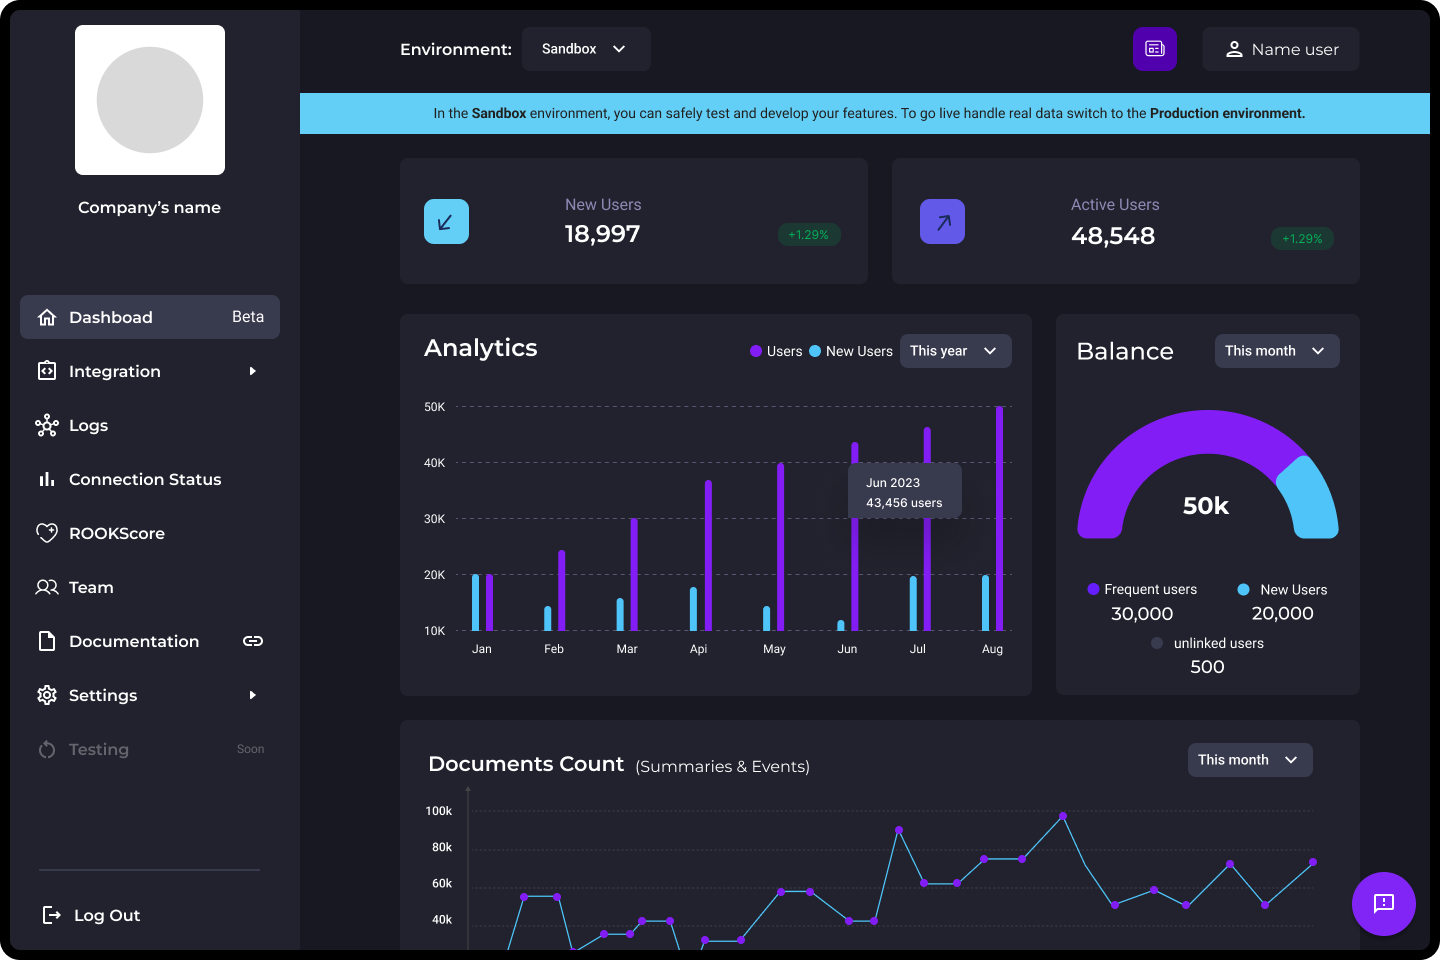
The ROOK Portal is the central hub for integration.
Once registered, you can:
- Configure data sources and webhooks.
- Monitor integration performance.
Note: Credentials for Production are generated after completing Sandbox validation.
Required Information
- Email and password.
- Company name, sector, and optional logo.
- Project lead's name and role.
- Estimated number of users.
Step 2: Test in Sandbox Environment
The Sandbox environment allows testing without impacting Production data.
The Sandbox environment is intended for testing and development purposes only. Once the integration is ready for deployment, ROOK will provide the Production credentials for activation and use.
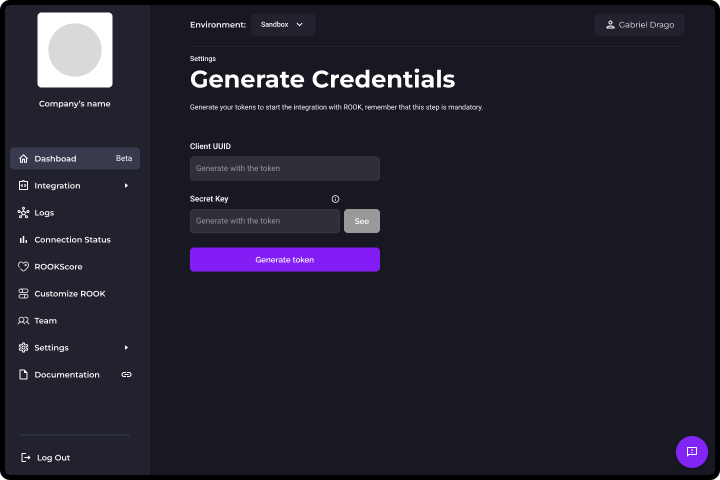
2.1: Generate Credentials
Navigate to the Settings/Credentials section to generate your Sandbox Client UUID and Secret Key.
- The Secret Key appears only once. Store it securely.
- Sandbox and Production credentials are separate.
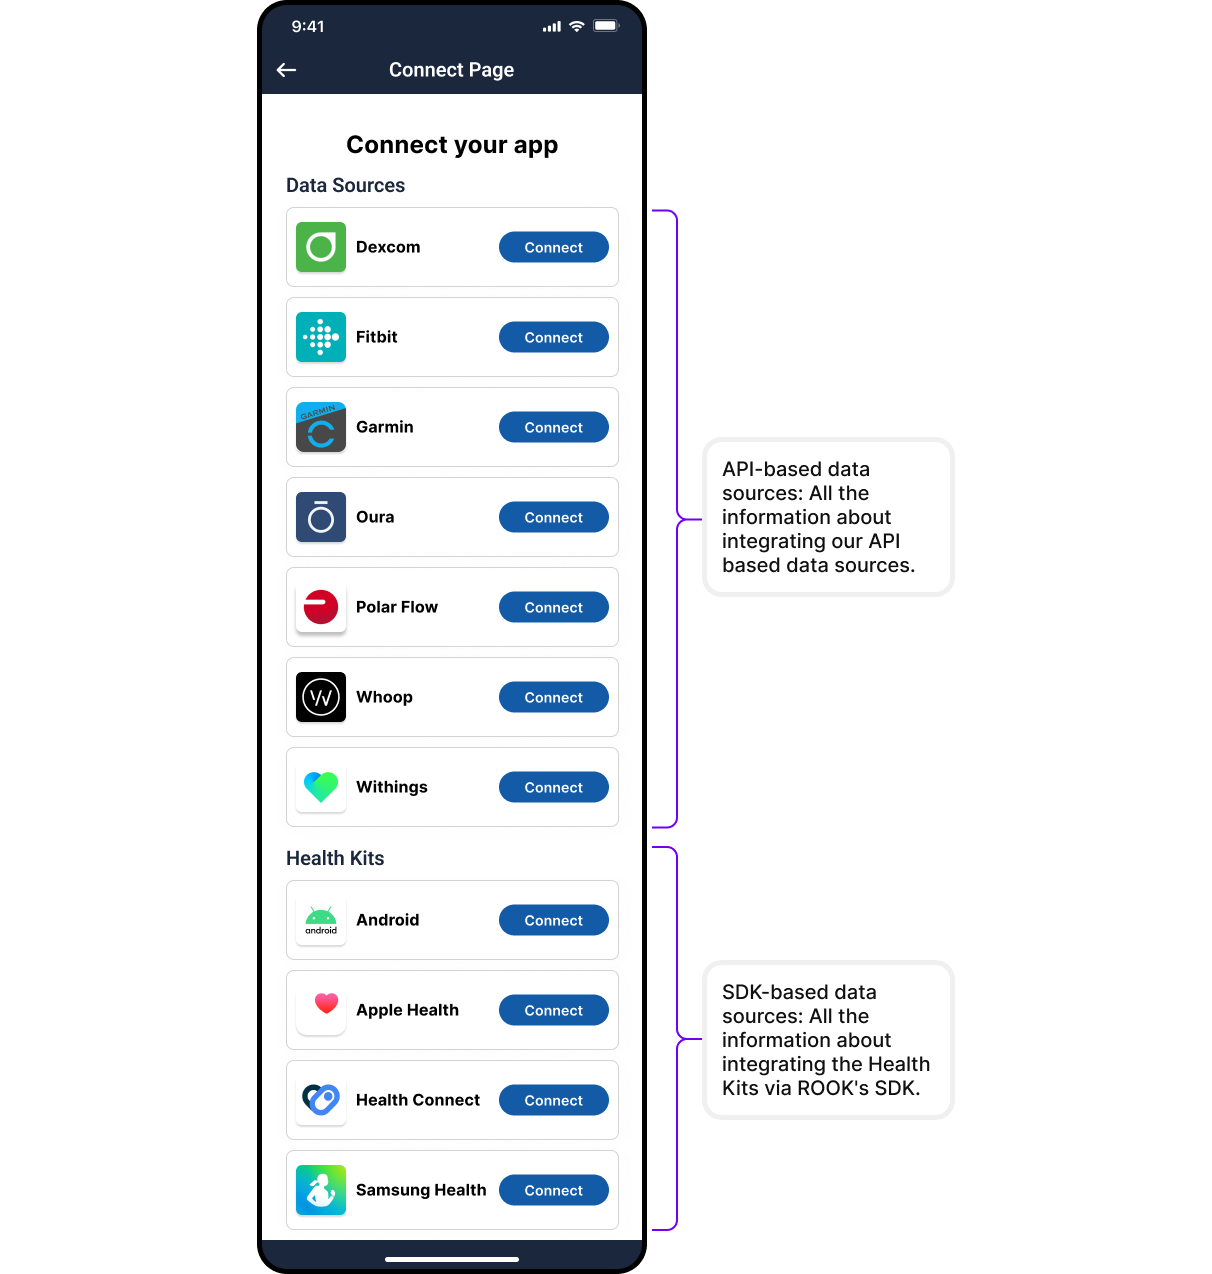
2.2: Test a Ready-to-Use Connections Page (Sandbox Only)
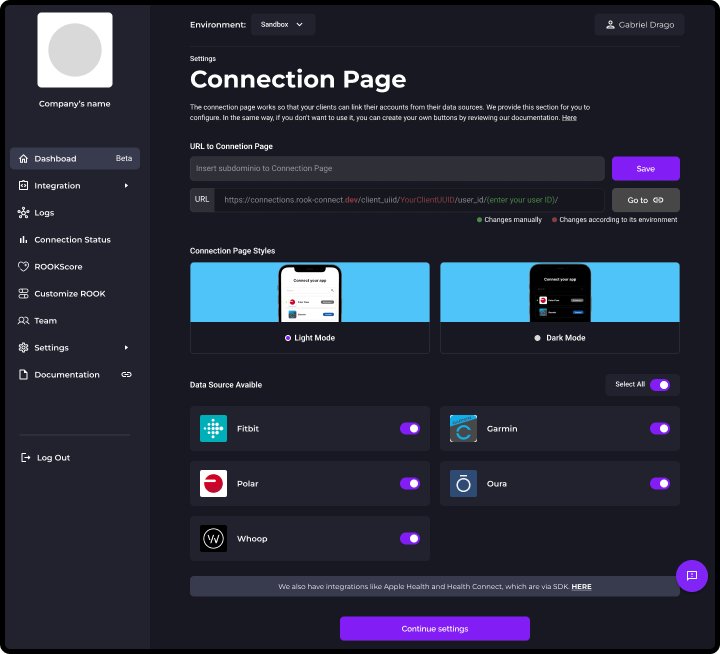
ROOK provides a Connections Page to quickly simulate how user authorization would appear during integration.
This page is intended solely for quick sandbox testing and should not be used in production environments.
Use the Sandbox Connections Page to validate the user authorization flow visually and quickly during testing.
Clients must build their own custom connections page or app view for production environments using the appropriate endpoints, as the sandbox Connections Page is not intended for live user authorization.
Optional: Configuring Data Sources in the Portal
In the ROOK Portal, clients can:
- Activate or deactivate visible data sources.
- Customize basic visual elements, such as colors, to simulate branding during the authorization process.
This configuration is intended only for the sandbox Connections Page and does not affect authorization flows.
Important Considerations:
- The Connections Page uses an older endpoint
/api/v1/client_uuid/{client_uuid}/user_id/{user_id}/data_sources/authorizers, which retrieves all data sources. - This endpoint is deprecated and is not recommended for production use.
- Configuring the list of data sources in the Portal only affects the display on the sandbox Connections Page; it does not impact the actual authorization process.
- In production, clients must use the individual data source authorizer endpoint, which allows direct authorization without needing prior configuration in the Portal.
Optional: Building a Custom Connections Page with the Authorizer Endpoint
Although the Sandbox Connections Page is designed for rapid testing, clients also have the option to start building a real custom authorization flow from the beginning.
By using the individual data source authorizer endpoint, clients can:
- Request authorization URLs dynamically for each data source.
- Fully control the branding and behavior of the authorization process.
- Simulate a production-grade user flow even during sandbox testing.
This approach is optional during quickstart testing but is recommended for clients who prefer to validate the complete production integration as early as possible.
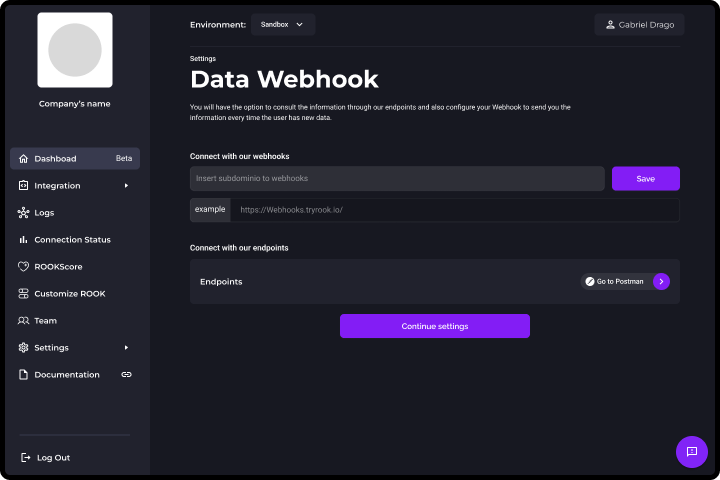
2.3: Set Up Webhooks
Configure the data webhook to receive real-time extracted health data.
- Provide a secure POST URL.
- Test payloads using tools like Webhook.site.
- Webhooks are the primary mechanism through which clients receive extracted user health data from ROOK.
- The API is available for specific queries and debugging purposes, but it is not intended for continuous data retrieval. See Data Delivery.
Optional: Notification Webhook for Integration Monitoring
ROOK also provides a Notification Webhook that sends real-time alerts related to integration events.
Unlike the data webhook, this notification webhook does not deliver health metrics. It is intended to help monitor and troubleshoot events such as:
- New user creation
- Data source connections or disconnections
- Failed data extractions
Setting up the Notification Webhook is optional and generally recommended for clients preparing for production deployments.
For configuration guidance, refer to the Data Delivery section.
2.4: Connect Users
Users must authorize ROOK to access their health data through either API-based or mobile-based sources.
-
API-Based Sources:
For API-based sources such as Fitbit, Garmin, or Oura, ROOK presents an authorization view where users grant access to their health data. After authorization, ROOK establishes the connection and begins extracting the user's data.- Use the Sandbox Connections Page for quick testing purposes only.
- For Production, clients must build their own connections page (for web) or an app view (for mobile) using the individual data source authorizer endpoint. This approach allows for full branding control and does not depend on prior portal configurations.
-
Mobile-Based Sources:
For mobile-based sources such as Apple Health and Health Connect:- Clients can develop their own APP by integrating ROOK SDKs, which handle both the authorization and the data extraction processes.
- Alternatively, clients can use the ROOK Extraction APP, which is ready-to-use and automatically manages user authorization and data synchronization.
2.5: Validate Data Flow
Validate the correct flow of health data after user authorization and connection.
-
Monitor Incoming Webhooks:
After users authorize ROOK to access their health data, monitor the configured webhooks to ensure that health metrics are being delivered correctly. This is the recommended method for validating that data from authorized users is flowing without issues in near real time. -
Query the API (Optional for Debugging):
Clients can also perform on-demand queries to the ROOK API to retrieve specific user health data. However, using the API as the main method for continuous data retrieval is not recommended for Production environments. Webhooks provide a more reliable and scalable delivery mechanism. -
Validate Schemas:
Use the reference documentation at Data Types to ensure that incoming payloads match the expected structures for summaries and events.
2.6: JSON Simulator - Testing without devices
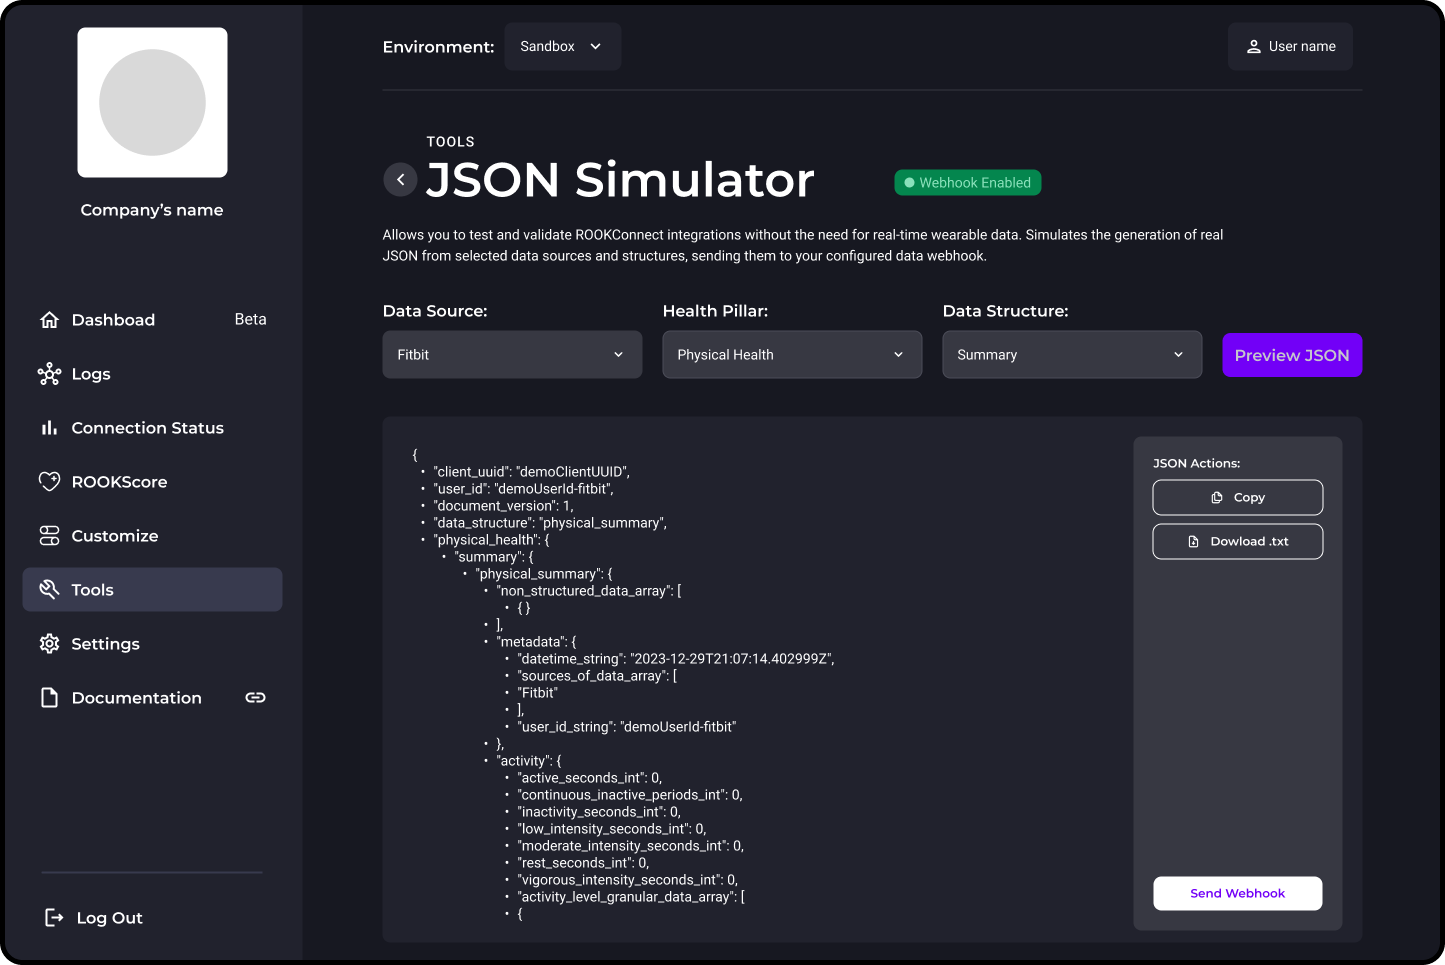
The JSON Simulator is the fastest way to validate your ROOK integration without relying on physical wearables or generating actual data. It allows you to simulate, visualize, and send real JSON to your Data Webhook configured in the portal.
Before you begin, make sure you have an active Data Webhook in your project. If it doesn't exist, the portal will automatically redirect you to the configuration.
1. Access the JSON simulator
On the ROOK Portal, navigate to Tools → JSON Simulator. Here you will see the status of your Data Webhook.
- Webhook active: you can continue with the tests.
- Webhook inactive: you will not be able to send the JSON until it is activated.
The simulator automatically validates the webhook to avoid failed tests.
2. Select the type of data to simulate
The simulator generates JSON using ROOK’s official data structures and applies the same structure configurations defined in your portal, such as enabled data and granularity. Choose the combinations according to your needs:
-
Data source.
-
Pillar of health - Only pillars compatible with the selected data source are shown.
- Body
- Physical
- Sleep
-
Data structure - enabled depending on the selected pillar. (Examples: Summary , Activity , Steps Event , Heart Rate , Nutrition , Hydration , etc.)
3. Generate the JSON
Press Generate JSON. The simulator will create a real JSON based on the official ROOK structure, including:
- A generic user_id (does not affect KPIs).
- All keys complete and without null values , ideal for pipelines and dashboards.
4. View, copy, or download
After generating it, you will be able to:
- Review the JSON in a readable format.
- Copy it to the clipboard.
- Download it as a file.
5. Send it to your Data Webhook
If your webhook is active, press: Send to Webhook. This allows you to validate the entire end-to-end flow without wearables, the portal will show you immediate feedback:
- Sent successfully
- Webhook or configuration error
6. Repeat with multiple sources or structures
This helps validate how data changes between different providers before going into production. You can generate as many JSON files as you need, varying them as follows:
- Data sources
- Pillar
- Structure
Step 3: Transition to Production
When moving from the Sandbox (testing) environment to Production, it is essential to generate new credentials specific to the Production environment. These credentials must be updated in the integration before initiating any communication with the Production endpoints.
Using Sandbox credentials in the Production environment is not valid and will result in a 401 Unauthorized error when attempting to connect with the ROOK integration.
3.1: Request Production Enablement
Before accessing the Production environment, contact ROOK Support to request Production enablement. This step ensures all configurations are verified before proceeding.
3.2: Configure Production Environment
Follow the same process used in Sandbox:
- Generate Production credentials in the ROOK Portal.
- Configure Production data sources, if necessary, for visibility in the portal.
Important: About Configuring Data Sources
Configuring data sources in Production is generally unnecessary:
- The Sandbox Connections Page is not available in the Production environment.
- The previous
/data_sources/authorizersendpoint is deprecated and should not be used for Production flows. - In Production, clients must use the individual data source authorizer endpoint, which does not require configuring available data sources through the ROOK Portal.
As a result, configuring data sources in Production does not impact authorization workflows.
- Set up Production webhooks to receive live health data.
Note: Data Flow Consistency
Data flows and webhook payloads follow the same structure as in Sandbox. However, Production data reflects live user activity and must be handled according to your platform�’s security and processing standards.
3.3: Connect Production Users
-
API-Based Sources:
As in Sandbox, users must authorize ROOK to access their health data. However, for Production, it is mandatory to build a custom Connections Page or mobile APP view using the individual data source authorizer endpoint.
Using the Sandbox Connections Page is not allowed in Production environments. -
Mobile-Based Sources:
Either integrate the ROOK SDKs into your mobile APP or deploy the ROOK Extraction APP to manage mobile-based data collection and authorization.
3.4: Start Receiving Live Data
After connecting Production users:
- Monitor incoming data through configured Production webhooks.
- Use the ROOK API for specific queries when necessary (for example, for data verification or debugging).
- Refer to Data Types to validate the structure and consistency of incoming payloads.
Conclusion
ROOK's QuickStart Guide provides a clear foundation for integration:
- Create an account on the ROOK Portal.
- Test in Sandbox to validate workflows.
- Transition to Production for live data delivery.
To continue building a full integration, explore the following topics for advanced setup: